Shear Blade Adjustment
CAUTION! – SHUT OFF ALL ELECTRICAL POWER TO THE ROLLFORMING LINE AND ASSOCIATED
EQUIPMENT. SHUT OFF ALL AIR TO THE SHEAR AND DRAIN THE TANK OF ALL AIR PRESSURE VIA
THE DRAIN VALVE.
Move Top Blade:
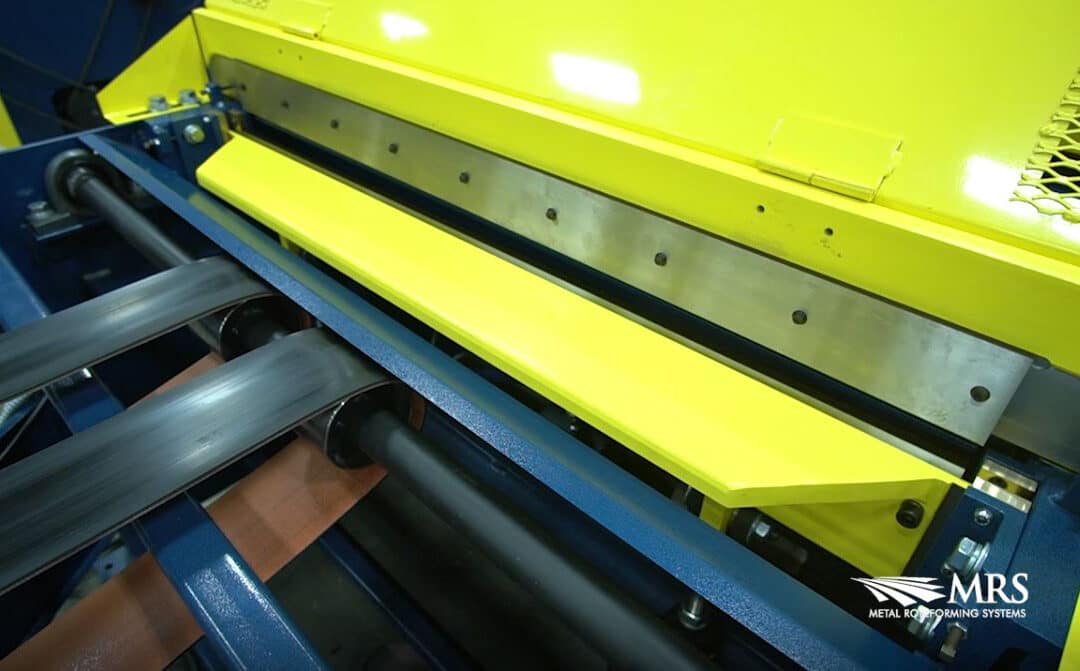
1) Move top blade back towards infeed rollers to ensure there is clearance between the top and
bottom blade by loosening the ¾” bolts as shown below.
* This will ensure that when you raise the bottom blade, it will not make contact with
the top blade.
2) Take the jacking bolts as seen below to help move the black back.
Adjust Bottom Blade Holder:
– There are four brass guides which hold the blade holder in position. Two per side as
seen in picture below.
*As you operate the shear over time, the brass with normal wear can allow the
blades to become out of adjustment.
1) Loosen slightly the 5/8” bolts.
2) Take the two jacking bolts per side as seen above and snug them just to the point you can’t
get a .002” shim or a standard piece of paper between the blade holder and the brass in all four
points (as seen below).
3) Repeat this step on the other side of the blade
4) Once you feel that you have proper tension, take a large adjustable wrench and place it on
the actuator shaft as seen in the picture below.
* You want to lift up slightly to feel you have some resistance, but not too much.
Usually if the blade moves down slowly with light pressure from wrench, then that means good
tension.
IMPORTANT! – There is a shim located under the top blade as shown below in
its proper position. This is very important because it allows the blade to be tilted back slightly so
the bottom blade does not ride up the surface of the top blade, allowing it to only use the
cutting edge.
Adjusting the Top Blade to the Bottom Blade:
‐ The bottom blade is designed to have ¾” difference in height from one side to another.
This allows for a scissor effect rather than a chopping one.
1) Raise lower blade up to the point it overlaps the top blade by 1/16” on the high side, as
seen below.
2) Starting with the high side, match the cutting edges as seen in the pictures below.
Adjust the top blade by using jacking bolts to the point of both blades touching.
3) Once the high side is adjusted, repeat the same steps for the lower side.
4) After adjusting the low side, you need to check the high side. You may need to readjust.
5) Snug and tighten bolts. DO NOT OVER‐TIGHTEN BOLTS.
6) Once you have adjusted both side of the blade, lower bottom blade back down all the
way.
7) Place paper as shown across blade.
8) Raise up forcefully to cut paper in one swift motion
* The paper should be cut, not ripped.
Failure to Cut Paper:
‐ Re‐adjust the blade as discussed in previous steps to close gap on cutting blades.
Shear Blade Adjustment Video
Recent Comments